Sunday, July 31, 2011

Alicia Melchiott - Uniform finished!

Here we go everybody!, the uniform is finished and i can't add anything more until after i have made the armour!.

After the modelling putty hardened, i filed it smoother using sandpaper, then i painted it black. Next step was to add the leathery fabric i found for this, i also sew the seam togheter for more strenght because the glue gun didn't stick as good on this. i fixed the edge to stick togheter with the sculpted black parts using superglue!. to finish them of i used the same wooly fabric i used on the gloves and glued it onto the seam, around the upper and lower edge, done!.


Now she's ready to get some armoured protection so that is what i'll do next, sculpt the scout armour plating!.


Saturday, July 30, 2011

Alicia Melchiott - Uniform part 3

Right folks, another update!

Made these squares on her straps, and they where a pain to create because they're small and still have four seperate squares within the square!


Also done the straps that'll hold her elbow plates aswell as the plates above the knee plates.


With these bits done its only the boots left before i can start adding armour.


Before i can add the boot's leather i had to sculpt a basic shape in "green stuff" modelling putty. i will use sandpaper to smooth these up and paint them black before i add the leather to overlap it, and then finish by adding the white edges like on the gloves.

And that's it for today, the putty got to harden for three hours so i'll let it do so overnight!


The imperial Front

Let me introduce the imperial front, which is a partner blog that follows a friend of mine's part in this project!. He is none less than the guy who introduced me to the franchise!, see more here:

Friday, July 29, 2011

Alicia Melchiott - Uniform part 2

Here's a few new pics of the uniform as i process, now it closes to done. just need some of the smaller detailings done before i can do the boots and armour!. I did also decide to re-do the red/white straps, even though i said i didn't want to do it, because i later realised i just can't be lazy on such things if i am to do my best.


Lots of work with folding the cloth here in order to create the lines in the clothing, but it went fairly smoothly.


hands...gloves...a pain in the butt, trust me. it's not just that hands are a complex thing to detail, its hard to make it look decent too, all the way from the armature to the finish, but nailing the armature is a great help though, and gloves are easier than makin bare fists too. But these went fairly well so i can't complain.


Thursday, July 28, 2011

Alicia Melchiott - Uniform part 1

Time to pick up this lovely gallian blue cloth, scissors and hot glue, time to make a uniform!. everything is put togheter with carefully using hot glue, its esaier and faster than sewing. all edges are also folded in with glue to look smooth.


starting of with the leg clothing, by adding it on top of the skin, and then adding the skirt upon that, i even made her panties for those perverted bastards who dare loon under her skirt :P


Next up was to add the black underside of the arms and the sides of her body, its important to add everything in order, the pieces that must be on top must be added last, it's really easy to make mistakes regarding this.


Added front and back pieces of blue


Then i added these white and red straps over the borders of the black and blue. They ended up a tad whider than i intended to, but not much enough for a redo.


Finaly i added the black midsection bit that connects the top and skirt parts.


that's it for this time, next up is to add the white bit of the top of the uniform, aswell as other finishing touches!

Alicia Melchiott - Latex Skin

To create the few areas where Alicia have visible skin, i chosed to do a very easy method. Start with gluing cloth onto the areas where skin should be seen, and make sure it is as smooth as possible, and that it covers a bit more than you need because her clothes must have skin to cover a bit, making it more realistic.


Finish with a few layers of coloured latex, i did 4 thin layers. You can colour latex in a few ways, one is with acrylic paint, and the other is with colouring powder. The powder is prefered on areas where the skin will bend alot, acrylic paint can be used on areas like this, so that is what i did. ther eason Latex is prefered over just painting the skin is that it gives it a more skin-like finish and will stick out from the clothing bits more, otherwise it might look like skin coloured clothing.


Wednesday, July 27, 2011

Alicia Melchiott - Foam Body

This is the foam body that i made for Alicia, why foam? well, its cheap to get lots, and its light, it ads close to no extra wieght to the puppet. And its soft and bendible, aswell as easy to carve in.


I use a sharp razor knife to cut out the basic shape, then i use scissors to carefully cut out the shapes. i then cut lines in the foam, preferibly on the back of her body, or inside of the legs, basicly the part thats less visible (not that it makes that big a difference once i put her clothes on). I then carve out a slight hollow space inside each foam part to fit the armature in there without changing the shape of the foam (so i wont need to force it on). cut out the basic body shape, no need to be perfect, i cut the boot shape on her lower legs rather than the shape of her legs because it helps filling out the boots, most important is to consider the final shape with outfit rather than realistic body (to a certain degree).


Finalized body, next step is to sculpt the underside of the boots before i add the boots leather on top of it!.


Tuesday, July 26, 2011

Alicia Melchiott - Wireframe Armature!

The wireframe armature is done, you can follow the process bellow!. First of let me tell you that this is a much cheaper way of making a armature compared to contructing a more complex one or buying a kit, the negative part with those are that they will be worn out and snap if you use it often. So basicly those can't last a longer film, but my first puppets held for a 9-min film and are still intact, so i can't really tell how long they'll hold. Anyhow, these valkyria puppets will not be used for any longer animation so its a perfect choice now especially since im saving up budget for a bigger project.


Starting of with the Wireframe Armature!, you will need aluminium wire of different thickness (depending on puppet scale). Here you can see i did each part to fit the templete scetch. I then put stiff wire on the shoulders and hips, and wired it togheter with thin wire. Last i sealed it all togheter with a hot glue gun and made sure the glue sticks into the "wire netting". Make sure to make all limbs and the neck a bit longer than the scetch tells you, you will need extra for fitting hands, feet and its smart to chose how long bit the neck needs after you construct the head (see later in the blog).


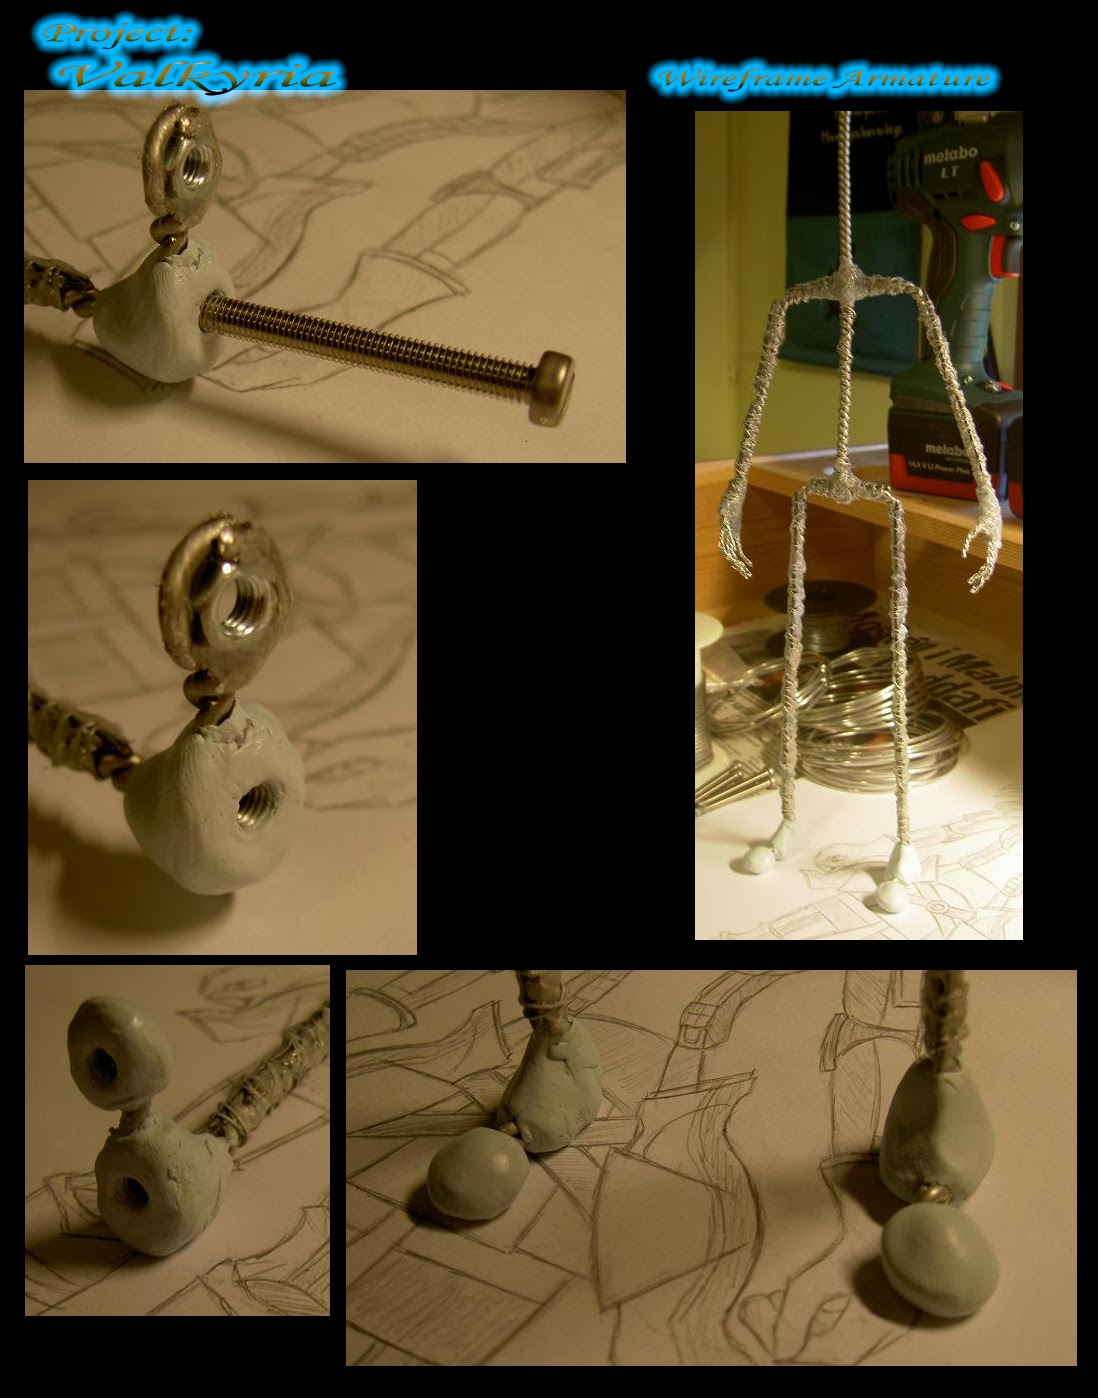
For the feet you will need to have quite a bit wire lenght saved up on the legs, so that you can curve them around the bolts and temporarily fit them with hot glue before securing them with epoxy. This construction is for double-jointed feet. Alternatively you can have just a bolt in the toes, it should probably be enough but i chosed to have two. The armature already stands properly even before epoxy and sculpt!.


The hands are tricky but doable. First of i curled two rows of thin wire togheter (a very long bit), then i swisted it around the top of the arm bit (the palm) and then i shaped out fingers, so each finger is consisting of 4 wires twisted togheter. Once i have the whole hand done i twist the remaining bit around the palm aswell. i then take even thinner wire and form up a netting around the hand centre by twisting it around the hand. Finally i secure the shape with hot glue forced into the wire netting.


To secure joints to be bendible only where they are supposed to, i took stiff wire and wired it onto the sections that should be un-bendble using thin wire, then secured them with glue aswell. The hot glue is good because its thick and bendible, but secures it in place.


Finaly i sculpted epoxy putty around the bolts. First of put the screw into the bolt so that no epoxy gets into the hole where the screw later should go, this way you secure its function. This is two-component epoxy that gets really hard once it's hardened, it takes roughly 5 mins. A good idea is to shape it at least roughly the shape that the feet/shoes will have later. The armature still stands nicely without help!


The finished armature put on the scetch, i also added rough dimensions for those who want to make one. This armature is roughly 1/5 scale or 1/4 scale, or something between (stop motion puppets dont need to have a exact scale though, but its nice to comapre).


Thats all for now folks, i'll be back soon with the Foam body sculpture of alicia!

Sunday, July 24, 2011

Alicia scetched up!


Done a scetch of Alicia on a A3 paper to get the size i want for the puppet, i went for a larger size than my previous puppets which have been about 9" tall (roughly 1/7 scale), but had their limits. Alicia will stand approx 15" tall (rougly 1/4 scale) and have a much less limited movement. she will have jointed toe-section of her feet, allowing a far more realistic walk animation than my previous puppets. i will begin creating the armature shortly, following my guidlines i drew on the scetch.

Friday, July 22, 2011

Project Starts!

I ordered some Polyurethane resin and silicone, aswell as vaseline and super sculpey a few days ago, and it all arrived today!. so i went to my storage  without delay, and found all my old cloth and other stuff i might need for this project. so as a first character i did chose noone less than Alicia Melchiott.

there is aluminium wire that will be used for the armature of this puppet, and the foam will be used to carve out her body. epoxy will be used to seal bolts in each foot in order to serve as a way to secure her to the stop motion set. i will also try something new this time that is double-part feet, so basicly there will be two bolts and i can animate her front half of the foot (toe section) for more realistic walk cycles.  i also found a pile of usefull cloth such as almost correct "gallian blue", varied reds and brown, a leather-ish brown for the boots and belts etc. head will be made in super sculpey and then moulded and cast in resin, same goes to armour pieces. there will be changeable face expressions and eyes for animation purposes!.

Anisette is taking the stage

"lt me show you what a star can do!"

I have now decided that i will do Anisette Nelson aswell. as a fan of both characters, both being among my faves from both games. Creating the Nelson sisters will be a nice display and adds fun ideas for animations to do with them.

Anisette will have her Lanseal shocktrooper outfit, most likely i want to base it on the veteran trooper look, as i love the white/grey camo pattern as a contrast to Edy's blue-ish armour. Anisette will also feature a machinegun in style with those in VC2. the picture above is Anisette in gunner outfit, altough i checked and they are identical, except that the bags are replaced with armour, and she should have gauntlet armour aswell.

Thursday, July 21, 2011

Welcome to Project: Valkyria


Welcome to the Valkyria Project, as the description says, i'm going to create fully poseable stop motion puppets out of a few of my fave characters from valkyria Chronicles (1,2 and 3). these will be used for short animation clips, for experimenting and testing animation and effects. as these are not my own designs or licence, i'm not to produce any full film with them, might still do fan-shorts however!.

the characters i have decided on this far is the following:

Alicia Melchiott
Alicia will feature her scout armour outfit, exchangible head for valkyria mode. rifle aswell as lance and shield!

Edy Nelson
Edy will be created in her Shocktrooper armour and armed with her machinegun

Aliasse
Aliasse will have her valkyrian outfit and her lance and shield

*Note that i might add/remove characters depending on inspiration and motivation.

Characters under Consideration:
Freesia York
Susie Evans
Anisette Nelson
Reila